
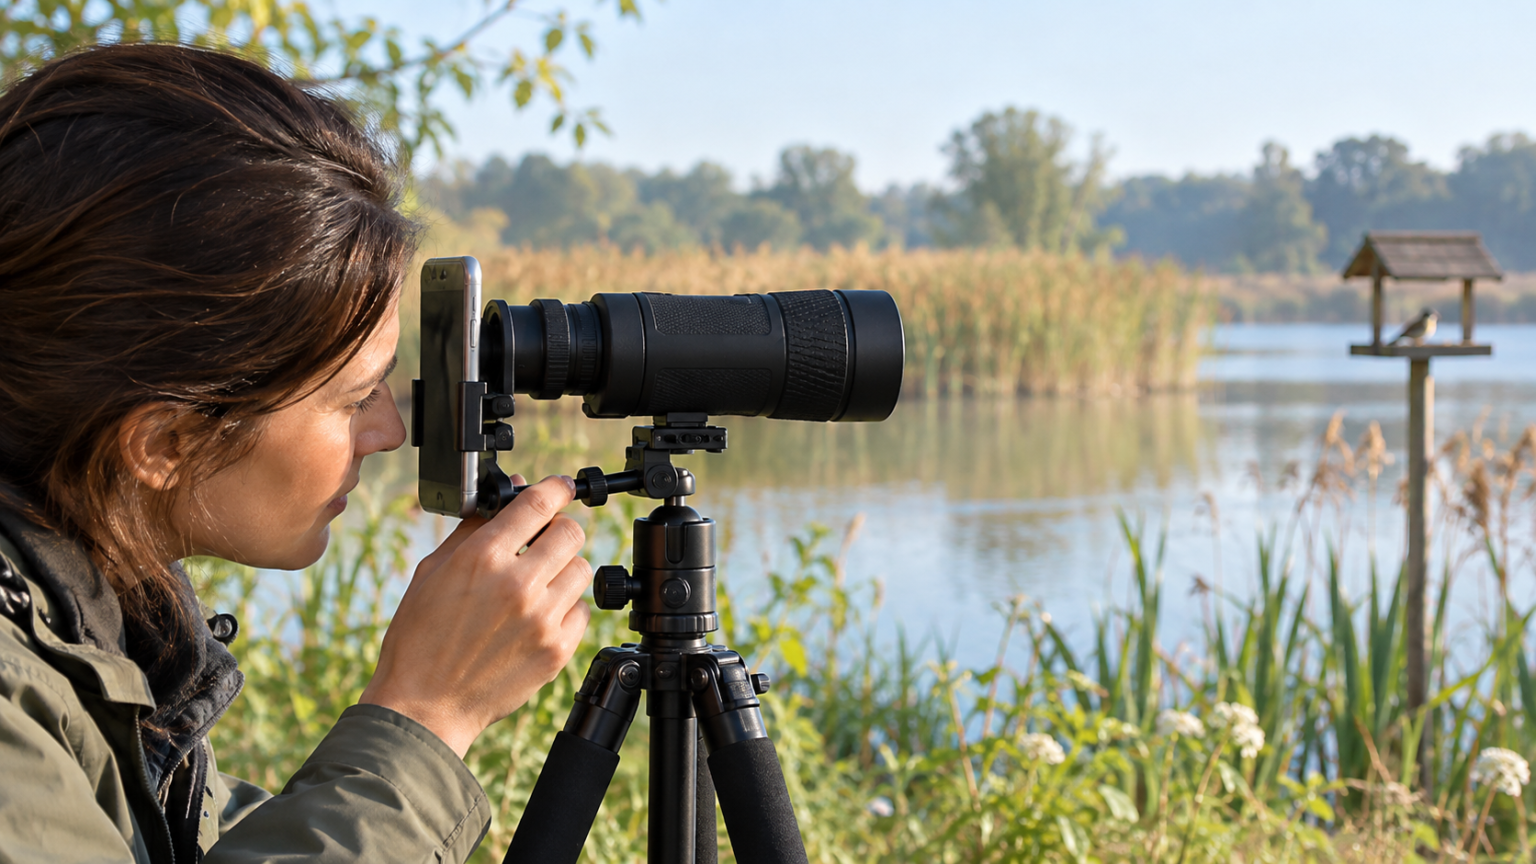
Smartphone photography through a monocular works by placing the phone’s camera where your eye normally sits. The challenge is getting the active camera lens centered, at a suitable distance from the eyepiece, while keeping the whole assembly steady. A modest monocular with good alignment can produce a more useful record than a powerful one that is shaking or pointing at the wrong camera lens.
Start with a stationary subject in good light. A distant sign, building detail or empty bird feeder lets you work out the setup without a bird disappearing between adjustments. Never aim the monocular or phone-through-optic setup at the sun.
Check fit before buying an adapter
“Universal” does not mean every phone, case and eyepiece combination will fit. You need room for the phone clamp, a secure attachment to the eyepiece and enough adjustment to place the selected camera over the optical path.
For example, Celestron publishes specific phone and eyepiece clamp ranges for its NexYZ DX adapter, which offers adjustment in three directions. Its smartphone-adapter compatibility checker is a better starting point than assuming compatibility from a product photograph. Other adapters have different limits.
Check the actual mounting surface on your monocular. A soft eyecup, moving focus ring or narrow tapered section may not provide the attachment the adapter needs. A clamp must not immobilize a control, distort the eyecup or rest on the lens itself.
Also consider the complete load. A phone and adapter add weight behind a small optic. If support is necessary, confirm how the monocular or assembly can be mounted; an adapter that holds the phone is not automatically a tripod mount for everything attached to it.
Set up the monocular before the phone
Find the practice subject with your eye and focus the monocular on it. Support the optic in the position you intend to use for photography. If you have a zoom monocular, begin at its lowest magnification.
Avoid choosing a practice subject inside the minimum focusing distance. A nearby flower may be convenient, but a monocular designed for more distant subjects cannot necessarily focus on it. Our close-focus explanation helps identify this limitation before you spend time adjusting the phone.
Once the view is clear, attach the adapter according to its instructions. Make small adjustments to a securely supported assembly rather than holding several loose parts above the ground.
Find the camera lens the phone is actually using
Phones with several rear cameras make alignment less obvious. The lens that looks central in the camera cluster may not be the one producing the current preview. Check your phone’s documentation and camera settings to identify the active camera in your chosen mode.
Begin with a standard photo mode and a known camera selection. Celestron’s guidance on setting a smartphone camera lens for an adapter describes the problem of automatic camera switching. If the phone changes cameras, the monocular’s image may suddenly disappear. Where the phone allows it, keep the selected camera consistent while setting up. Do not assume every camera app has the same lens-lock control.
Position that camera over the eyepiece without pressing the phone’s lens against the glass. Keep fingers, clamp jaws and the phone case out of the optical path. A case that prevents secure seating may need to be removed if the adapter maker recommends doing so.
Align in three small steps
1. Center the bright circle
Open the camera preview and move the phone gently from side to side and up or down. Look for a complete, evenly illuminated circular view. If one side is black, correct alignment before changing focus or applying phone zoom.
2. Adjust the distance from the eyepiece
Move the camera toward or away from the eyepiece within the adapter’s permitted adjustment. This spacing matters as well as centering. The position that works for your eye is only a starting point for the phone camera, not a precise measurement to transfer blindly.
3. Secure, refocus and inspect
Tighten the fittings as instructed, then check the preview again; tightening can shift the alignment. Adjust the monocular’s focus carefully if necessary and let the phone focus on the image. Where supported, tap the subject and use focus or exposure lock to keep the result consistent.
Take a test photograph and inspect it at a useful viewing size. The live preview can make a slightly soft image look more convincing than the saved file.
Reduce movement before adding magnification
Keep the assembly supported and avoid gripping it so tightly that every small hand movement reaches the phone. A short shutter delay or a compatible remote can help reduce movement from pressing the on-screen shutter. Use an option you already have before assuming more accessories are needed.
If the bird moves, support alone will not freeze it. Good light gives the camera more flexibility, while a brief video can sometimes preserve posture or behavior more effectively than repeated attempts at a still photograph. Review the original footage before relying on a selected frame for identification.
With an optical zoom monocular, increase power gradually and check focus, alignment and stability again. Our fixed vs zoom comparison explains why the highest setting is not always the most useful one.
Troubleshoot the picture you actually see
| Symptom | Likely things to check | First adjustment |
|---|---|---|
| No circular view appears | Wrong phone camera, a cap still fitted or severe misalignment | Confirm the active camera and optical path |
| A dark crescent covers one side | Camera is off-center | Shift sideways or vertically in small increments |
| The circle is small or edges black out easily | Spacing and centering are unsuitable | Adjust camera-to-eyepiece distance |
| The circle looks clear but the subject is soft | Monocular focus, phone focus, subject distance or movement | Recheck focus on a stationary, sufficiently distant subject |
| The image disappears after changing phone zoom | Camera selection may have changed | Return to the original camera mode and realign |
| The photograph blurs when you press the shutter | The assembly moved | Add support and try a delay or compatible remote |
These checks identify common setup problems rather than diagnose every phone. If the assembly will not hold alignment without overtightening, stop and revisit compatibility.
Crop carefully and keep the original
A dark circular border is common when a phone photographs an eyepiece image. You can crop a copy for presentation, but cropping discards part of the file. It does not recover feather detail that was never recorded. Increasing phone zoom merely to hide the border can also make judging the original framing harder.
Avoid multiplying every displayed zoom number and advertising the result as equivalent optical performance. Your monocular’s magnification, the phone’s camera selection and any digital crop are separate parts of the process.
Keep an untouched original alongside the edited copy. For wildlife records, note the date, place and observations made with your own eyes. If a feature is unclear in the photograph, describe it as unclear rather than sharpening it until the result looks persuasive.
Build a setup you can repeat
After a successful practice session, note the camera mode, adapter orientation, eyecup position and monocular setting. Photograph the assembled setup with another device if that helps you reconstruct it at home.
Keep the mounting surfaces and eyepiece clean; our monocular cleaning guide explains how to remove grit before wiping. If you are still choosing the optic, use the monoculars under $100 guide to compare the core viewing features first. Phone compatibility is valuable, but the monocular should still give you a comfortable view when the phone stays in your pocket.

Elliot Vantage is an optics enthusiast and the editor behind Optic Horizon, covering monoculars, binoculars, thermal optics, and related outdoor gear. He researches manufacturer documentation, optical specifications, product features, pricing, and use-case differences to help readers understand their options and choose equipment that fits their needs.